

ICMPP246AU - ICC Cat6A 10Gig 24 Port Patch
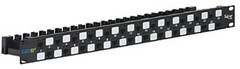


The ICC ICMPP246AU Cat6A 10Gig 24 Port Patch Panel is a complete Cat6A patch panel kit that includes a 24 port panel, and 24 CAT 6A component rated high density (HD) modular connectors. Each HD modular connector consists of 50 micro inches of gold plated contacts for superior performance and utilizes a shielded wire cap to secure the rear 110-IDC punch down terminations. The ICMPP246AU Cat6A 10Gig 24 Port Patch Panel allows you to populate the panel on your own as you terminate each port. The ICMPP246AU is designed specifically for Cat6A 10 Gigabit network applications.
The ICC ICMPP246AU Cat6A 10Gig 24 Port Patch Panel exceeds TIA-568-C.2 performance standards. The ICMPP246AU includes 24 pieces of UTP high density (HD) modular connectors, a rear cable management bar and accessories that mount easily to racks or other 19” wide equipment. Assembly Required.
- Includes: (1) ICMPP246AU Cat6A 10Gig 24 Port Patch Panel
- Accommodates ICC CAT 6A UTP and FTP modular connector
- Designed to minimize the alien crosstalk for 10G applications
- Includes rear cable management to facilitate proper bend radius of cable
- Compatible with standard 19” distribution racks
- Part#: ICMPP246AU
ICC ICMPP246AU Cat6A 10Gig 24 Port Patch Panel Installation Instructions
Step 1: Mount the ICMPP246AU patch panel to the rack using four (4) #12 rack screws.
Step 2: Install the cable management bar onto the rear of the ICMPP246AU. Tilt the bar upwards 45 degrees. Next, insert the tabs on the bar into the slots on both sides of the panel, then tilt the bar down.
Step 3: Insert the CAT 6A HD modular connectors into the open ports on the ICMPP246AU panel. Note: Inspect the connectors to ensure it is fully seated, and the front is ? ush with the panel.
Step 4: Secure the cable to the cable management bar using a nylon cable tie. Note: A slot is designed on the bar, allowing you to insert and loop the tie around the cable.